Tuesday, June 29, 2010

Garlic and Cheese Quickbread


Tupperware - If you know me then you'll know my intense dislike of it. I think it's born of sitting through the obligatory parties where you feel as if you are letting down a friend if you don't spend a ridiculous amount of money on something you can get for $2 at go-lo - sure it's purported to live forever but what modern woman wants to keep containers forever! I'm much more likely to buy fresh ones with the colour of my mood emblazoned on them whenever I feel like it!

I also have a grievance with a once gifted Tupperware chefs knife that has NEVER been sharp and had a warning of it's intense sharpness on it's wrapper - the thing is only good for chopping banana!

Anyway grievances aside - I received the "Cook some more" Tupperware cookbook as a wedding gift and as I am always tempted by recipes -wherever they come- from last night I had a flick through and decided to have a go at the garlic and cheese quickbread to accompany our steak and salad dinner.

It is quite a remarkable recipe - so very quick indeed! particularly as I had ready grated cheese, ready minced garlic and oddly had a chopped red onion sitting in a (go-lo) container in my fridge. The only misrepresentation is the word "bread" in the title - if you expect bread you will be disappointed. It's more like a savoury scone loaf, crumbly and dry but not with the buttery flavour of scones. The preparation took me literally 5 mins and the cooking 40mins.

Whisk in a bowl 1/3 cup milk, 1/3 cup oil and 3 eggs. Sift then stir in 2 1/4 cups self raising flour, 2tsp baking powder, 3tsp minced garlic, 100g grated cheese, salt and pepper. Press into a sprayed loaf tin top with 100g more cheese plus the onion and bake at 180C for 40mins.

Be generous with the cheese, salt and pepper. If you've got it I'd add bacon and some chopped herbs just to lift it. It really needs to be eaten right away with butter spread over each slice. It would also be worth a try in a muffin tin for individual portions.

Basically in the end it's kind of odd in flavour and texture but weirdly moreish! The house smelled divine, of cheese and garlic and onion and it looks really impressive - well worth a try even if it's just for how easy it is.

Thursday, June 17, 2010

Chocolate Stout Cupcakes with Peanut Butter Frosting


This recipe is from Donna Hay's 50th Issue Autumn 2010
I love the quirky ones and stout cake sounded like something fun to try.

You should've seen me in the bottle shop dithering over where to find the Guiness - it's never been clearer that we're not really drinkers at our place. The kind salesguy finally took pity on me and showed me the fridge section where they keep such things without laughing at me for being so naive. I finally explained that I was using it for cooking so I would seem like less of a fool and bought a bottle of wine too because he was so nice :)

But it was worth the foolishness - the stout makes for a deep, rich, dark cake that isn't too sweet and balances beautifully with the sweet salty frosting.

The original recipe is for a single cake but I made cupcakes because they are so much easier to take to work - plus I got some gorgeous papers for my birthday that were dark and beautiful too. This worked out well as it cut the 1.5hr cooking down to about 30mins in my super fan forced oven.

I also altered the frosting because I was almost out of icing sugar so it ended up as:

1 cup Peanut Butter
2T Icing sugar
1/2 cup caster sugar
1T butter
1tsp vanilla bean paste
a splash of milk (until it reached the right consistency)

The frosting was a little oily - really needing more icing sugar but tasted lovely - think Reese's peanut butter cup. I swirled it on and added a slice of mars to pretty it up.

The work ladies liked them for their lack of sweetness although the peanut butter was not to everyone's taste - but the Reese's adorers really enjoyed these.

Good fun to make and decadent but not sickly to eat- perfect!

Wednesday, June 16, 2010

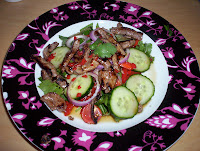
Thai Beef Salad


Just saying it makes my mouth water! How do the Thai people manage to get flavours so right. That hot, sour, salty, sweet balance that makes your tongue sing.

Plus it's healthy. This one is for the lovely friend who told me the other day that she enjoys reading my blog but can't make anything as she's on a diet. This is my version of diet food but I'm very fussy about it too.

I've eaten some terrible Thai Beef Salads in restaurants - the one with a soggy iceberg lettuce base, the one with pepper rather than chilli, the one with enormous hunks of beef. Ugh.

So I took it upon myself to make the perfect one - well, my perfect one. I acknowledge that my tastes may not be everyone else's and that it may not be authentic, i never have been to Thailand.

My first preference is using torn mint and coriander as the salad base. No salad leaves at all, I just don't think you need them.

Top with halved cherry tomatoes, sliced cucumber, sliced red capsicum (never green!!) and sliced red onion.

Then the beef, lean strips stir fried until toasty.

But most vital here is the dressing - make it to your taste and adjust the amounts as you go but basically

Lime Juice (not lemon!)
Fish Sauce
Soy Sauce
Brown sugar (could be palm sugar if you have it)
Chopped Chilli

Optional extras that I occasionally bother with but didn't this time:
sesame oil
minced garlic
minced ginger
finely chopped Kaffir lime leaf

I just toss the dressing through the salad, top with beef and then eat with great delight.

As Husband is allergic to chilli I leave it out of the dressing and just add it to mine. He's very new to Thai having avoided it fearing the chilli but we've got past the "just pad thai" to pad see ew and even a massaman curry! Maybe if I keep making it at home and altering to suit him he may get as addicted as I am.

Friday, June 11, 2010

Lemon Meringue Tarts


I've spend the last few days in bed sick which I hate. Sitting still just doesn't come naturally to me. So when I finally started feeling better at about midday today I got the itch to prove to myself that I was well again by baking up a storm.

Lovely Husband had brought some fresh lemons home from a friend at work so naturally that most traditional of Stepford treats came to mind - The Lemon Meringue Pie. I always enjoy making it because it is so simple but the finish is so spectacular, with the added bonus of being basically dairy free depending on the pastry you use.

I used a shop bought shortcrust (well, I have been unwell) and a Donna Hay recipe (from Modern Classics 2) that I tweaked a tiny bit. It turns out her amounts are perfect to make 12 tiny tarts in a muffin tray which was a necessity considering I don't own any of the required 6x9 pie tins. The muffin tray turned out to be brilliant for blind baking, cooling all in the fridge and sticking the whole lot under the grill in one go - very low maintenance.

To start with I cut out pastry circles and blind baked them in the muffin tin for 10mins and then 10mins without the baking paper and rice. My favourite Stepford tip for blind baking is to scrunch up the baking paper before flattening it out and popping the rice in - it always fits much more easily. Let them cool in the tray.

Then I made a lemon curd. 1 cup water, 3T cornflour, 1/2 cup sugar,1/2 cup lemon juice. I always check the lemon juice - if it's really sour I'd only add 1/4 cup and add a little extra water. Pop this all in a saucepan and whisk until boiling and thick. Take off the heat and whisk in 2 egg yolks and 60g butter. Set aside to cool.

When cool put a tablespoon into each pastry cup and chill.

The meringue is simply 3 egg whites and 3/4 cup sugar whipped up in the Kitchenaid until stiff and shiny. I put a table spoon on top of each tart and then put the whole tray under the grill until toasty.

I can't believe how good these are and how much the melty meringue almost approximates the squishy richness of a dairy product, sometimes us dairy intolerant folk need a bit of a treat too :)

I'm sure they must have therapeutic qualities. I'm feeling even better already!

Thursday, June 3, 2010

Strawberry Macarons Attempt #1


Tuesday was my birthday. 31. I feel like if I say it enough it might sound like it is real. I'm sure since being about 25 the rest has all been imaginary and I'll wake up one day in my old flat disappointed that I've missed out on all the fun of the past few years (and possibly slightly pleased to still be in my 20s!).

As well as the lovely Husband spoiling me with cake and decorations and gorgeous gifts (Donna Hay Subscription!). I received some lovely cookbooks from those who know me well enough to know my obsession with them. One was all about Biscuits & Macarons and as I have recently read quite a few blogs on the making of the mysterious macaron I was inspired enough to have a go.

The book had some lovely recipes, although it struck a particular bugbear of mine which is "renaming". If it is a fruit, nut, toffee biscuit with a chocolate base it is a Florentine! not a Nutty fruit delight or whatever odd name they try to pass off as their invention. Grr! - ok, rant over :)

I probably shouldn't have gotten creative with my first macarons ever but I had acquired some strawberry essence and wanted to make strawberry ones. So I borrowed the basic recipe from a different flavoured one and added my essence and some rose pink colouring.

The result? Well ok - they don't have a frill, they aren't smooth and shiny and the pink was thwarted by my fan forced oven which slightly browned them to the colour of an overcooked prawn chip. And yes I did - tap the bottom of the tins, let them rest to develop a skin for half an hour and i promise I didn't open the oven door and peek.

I did get lazy at 9pm last night when I didn't feel like making a strawberry buttercream and used a chocolate one I had already in the fridge in a piping bag - so I guess technically they are chocolate/strawberry macarons.

BUT they taste fabulous. Not too sweet with a subtle flavour and a lovely bite, and they take me back to the smell of my Strawberry Shortcake doll when I was a little girl.

I won't presume to give you a recipe until I get a proper successful batch but it was definitely fun to try and I'm inspired to keep going until I get it right. I'll test Nigella's recipe in "Domestic Goddess" next - she can always be relied upon.